
|
|
|
|
|
||||
|
||||||
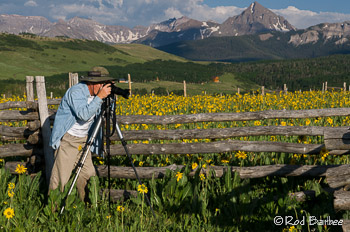
There are only two spaces left in the Colorado Mountains and Wildflowers workshop that Don Mammoser and I are leading in July (July 9-13). From what I've been hearing from Don, the wildflower season is expected to be a good one. Don't miss out on this spectacle!
|
||||||
|
||||||

If you're in need of a camera bag, Think Tank has free shipping for the month of May and is also offering a free 15" laptop bag with the purchase of any of their Airport Rolling Bags. The laptop bags are great. They're slim yet they can hold all your cords and such. I really like mine.
Read more here. |
||||||
|
||||||
|
So Lightroom 5 Beta is here. I've been playing with it off an on for the last month or so. I can tell you that there's not a whole lot in the way of cosmetic changes, but there's plenty under the hood. The first thing being speed. Lightroom 5 seems a lot peppier than Lightroom 4.
An interesting addition is Smart Previews. Smart Previews can be used in place of the original image. They live in the same folder as the catalog, so they can travel with the catalog. They are limited in size to 2048 px (though this may change, if it hasn't already) and can be used by the develop module as well as in Export, Publish Services, and Export to Email.
If your original files are available, they'll take precedence over any Smart Previews that you've built.
The great advantage of Smart Previews is their portability. You can take your catalog with you without the need of also hauling along a separate hard drive containing your images. So you can work on your entire catalog while on the road while your originals remain home safe and sound. Another feature I like is Upright. It's found in the Lens Correction section of the Develop Module. What it does is automatically straighten images. There are a number of methods to choose from and some work better than others, depending on the image. But in my testing, I find it to work rather well, especially on interiors taken with wide angle lenses. Also be on the lookout for more a sophisticated spot removal tool called the Advanced Healing Brush. No longer are you restricted to circles. You can now click and drag to create non-circular healing areas. There's also a new editing brush. In addition to what we're used to: Graduated Filter and Adjustment Brush, there's a new Radial Filter. It can create circular and elliptical shapes to apply adjustments to. So you can effect changes to the elliptical area chosen or you can invert the filter and apply changes outside the area chosen. Pretty cool. For a much more thorough rundown of new and enhanced features, click on over to Victoria Bampton's post on What's New in Lightroom 5.0 Beta |
||||||
|
||||||

The Palouse workshops are next month (Already!) and there is still time to grab a spot. As of this writing, there are still four spaces available in Part 1: Photographing the Palouse. There is also plenty of room in Part 2: Digital Workflow using Lightroom.
Here's your chance to photograph unique, graphic farmland landscapes as well as get a handle on Lightroom.
|
||||||
|
||||||
I've never seriously tried night photography before. Usually, the sunrise comes too early for me to stay out too late. Or I'm being called by a bottle of wine. Regardless of any lame excuses I might have, I've just not spent a lot of time working on night shots. I did try doing star trails once years and years ago, but that was a disaster. Turns out you don't want to use f/22 in the middle of the night. Who knew?
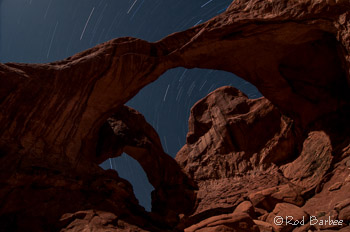
On the recent workshops Don Mammoser and I led to Arizona and Utah, we got to play a bit with some night photography. During the Slot Canyons workshop we were able to do a night shoot in Upper Antelope Canyon. Our native guides have really done their homework with setting up some really nice shots. They've spent considerable time experimenting with the light needed to light up the canyon walls while still getting a sky full of stars. I did find their recommendation of 30 seconds for star point to be way too generic. The actual shutter speed is highly dependent on focal length. I was using my Tokina 12-24mm on a Nikon D300 (which has a DX sensor) and 30 seconds was just a tad too long, even at 12mm. At 30 seconds I could detect some movement in the stars. A 25 second shutter speed seemed to work better for that focal length. And once you start zooming in with a longer focal lenth, the shutter speed needs to get even shorter. A general formula for a shutter speed to get star points for full framed (FX) sensors is 600 divided by focal length. I modified this for my DX sensor camera body to 400 divided by focal length. So for my 12mm lens, this comes out to 33 seconds. But looking at the pictures, even 30 seconds is still too long. So next time I get a chance to do this, I'll be using 25 seconds or shorter. During our Arches workshop, we spent a very pleasant evening at Double Arch making moonlit landscapes that contained star points, star trails, and fun light painting. The night was warmish, the sky cleared up, the company was great, and it was lots of fun. The only thing missing was the above mentioned bottle of wine (and if we had decent workshop leaders, we probably would have had that too). Needless to say (I hope) you'll need to experiment a bit with your ISO settings. You'll need higher ISO if you plan on including any landscape in the image. If you just need silhouettes you can get away with lower ISO. If you have a full moon, you can use a lower ISO. But hey, you've got an LCD display and a histogram on your camera so experimenting should take very little time. The star trails image accompanying this article is from a series of five minute exposures, blended in Photoshop. To get a better look, click on the image. I could have use a program called StarStax but since I had relatively few images (something like eight or so) I merely selected them all in Lightroom and chose Edit>Open as Layers in Photoshop. I then just changed the blending mode on all the layers to "Lighten." This basically lets only the star trails show through from the layers beneath the top layer. Each layer has the star trail in a different position and by blending them using Lighten, the final image shows one long trail. |
||||||
|
||||||
I should have some news about 2014 trips next month. Don Mammoser and I have been doing some planning and I've got a scouting trip planned to central Oregon later this month. I'll have a better idea of actual dates and locations then and hope to have a few things to entice you with.
|
||||||
|
||||||
It's never too early to start planning your fall color photography trips. I've got three of them that I'm excited about:
Michigan's Upper Peninsula
Canadian Rockies
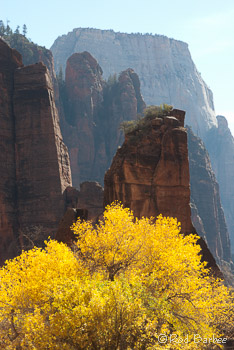
Zion National Park
All of these offer great fall color and gorgeous landscapes. For mountain landscapes you can't beat the Canadian Rockies. For dramatic red rock and fall color, Zion is the place. And for brilliant color, lake shore and waterfalls, then it's Michigan. Take your pick, you can't go wrong.
And if you're into fall color, vineyards, and some world class Pinot Noir, check out my Willamette Valley Wineries tour. The area offers good photography, good wine, and good food. You'll also make some new good friends. |
||||||
|
|
|
|||||