
|
|
|
|
|
||||
|
||||||
|
In case you're dyin' to know all the technical aspects of how polarizers work as well as when and how to use them, I haven't written that article. It just sounds tedious. But E.J. Peiker has. He's got a rather technical, but interesting and informative, blog post up on the Singh-Ray "Focus on Filters" Blog page.
|
||||||
|
||||||
(or just because I didn't want to write geekily about polarizers doesn't mean I won't write geekily about exposure)
It's that time of the year for fall color. It's even past time in some parts of the country so I probably should have posted this last month. Sigh.
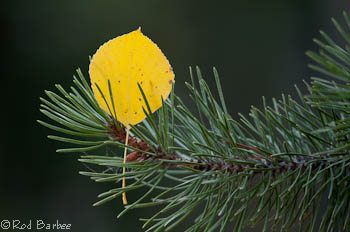
Yellow is one of the predominant colors at any fall color location but yellow can be a little hard to expose for if you're not careful. Yellow is a bright color. Brighter than red or orange. Definitely brighter than green. In fact, yellow is about one whole stop brighter than a medium tone. A grey card, grey rocks, bark, and most oranges and reds are all medium in tone. Yellow, being one stop brighter, reflects more light than those medium toned objects, twice as much light in fact.
So if you want yellow to come out right, you have to tell your camera to make it right. Now if you have a little bit of yellow in an overall scene, then you won't have any problems at all. But if you're whole picture is predominantly yellow, like a full frame shot of yellow leaves on a tree or a close up of a yellow leaf, then you'll have to make an exposure adjustment to make that light toned leaf come out correctly.
The trick to making yellow come out yellow is to over expose it from what your camera's meter indicates is "correct." Do this by using the Manual Exposure mode on your camera and changing your settings until you get an indication on the meter of "+1". That's one stop brighter than medium. Keep in mind your camera may have one or two intermediate markings between the full stop indicators. Consult your camera manual if you're not sure.
I find that using my camera's built in spot meter is the best way to make sure I measure the section of tree or leaf that I want to use for setting the exposure. |
||||||
|
||||||
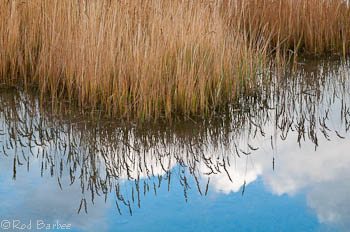
One of the things I most enjoy about photographing is finding little scenes or pieces of the landscape that attract my attention for whatever reason. These images are the kinds of things that only I am likely to find because they come from my own personal preferences for design or lighting or graphics or mood. For this reason, I call these "Personal Landscapes."
Last week I was in Grand Teton National Park leading a small workshop group (you can see some images here). One of the participants expressed the same affinity for these kinds of images. Only she called them "glimpses," a term she learned from--I believe it was--Freeman Patterson. I thought that was a great term. Glimpses are those things that are just barely revealed. You really have to be paying attention and be open to noticing to catch them. Catching these glimpses is what can make your photography a very personal thing. It's what can eventually lead to your own personal style. So keep your eyes and mind open. |
||||||
|
||||||
I've got my 2011 workshop schedule, such as it is at the moment, posted on my Workshops Page. There's plenty of room in all workshops right now.
One thing I'm thinking of for next year is to try out one or two "exploratory" workshops. These would pretty much be like a normal field workshop only they'd be to an area I haven't been to before. In other words, an area I need to explore. And since we'd be doing the exploring together and making all the mistakes you need to make to get to know an area, the cost of these workshops will be lower than a regular workshop. You'd still have me there for technical and compositional help, like a normal workshop, and you'd be learning how to "learn" a place as well. I've got a bit more about these on my web page. Let me know if this is something that would interest you. |
||||||
|
||||||
|
I'm trying to put together a workshop to Death Valley for early next March. I'll be co-leading this trip with my friend Shellye Poster, who actually lives in Death Valley and who authored "The Photographer's Guide to Death Valley." The tentative dates are March 2-6, a date that might be subject to couple of things. But right now, that's the plan.
Since March will here before we know it I'd like to try to get an idea of whether or not there's enough interest in this trip before I go making all the arrangements. Otherwise I might try for next November if I could fit it in.
So if any of you out there would be seriously interested in a Death Valley workshop in March (with a possible add-on day to The Racetrack!) let me know. The cost of the workshop would be around $750 (meals and lodging not included) and the cost of any add-on trip would be whatever it costs us for the guide service to take us out there. |
||||||
|
||||||
That's it. Next week is the Oregon Wineries tour (with a quick stop to the Columbia River Gorge on the way). Hopefully I'll come back with some good stuff.
And some good pictures too! |
||||||
|
|
|
|||||